- Read Tutorial
- Watch Guide Video
Now I'm going to give a few caveats to this guide. One if you already have a GitHub account and you have git on your system then you do not need to follow along you can move on to the next guide.
Also if you don't want to use a version management system and you just want to keep all your code local then you also can continue. This is only needed if you have never worked with git before you want to be able to store your code remotely. I will say that using git is one of the big prerequisites that you're really going to have to become familiar with as a developer. So right here if you see my page this is my personal GitHub profile and it shows all kinds of different data points so each one of these little blocks shows how many different contributions that I performed on a given day. So right here on November 14th of 2017 I had 40 different contributions which means I pushed up 40 different changes to an application.

And so you can see exactly in a heat map area exactly when you've done a lot of work versus when you might not have done quite as much. You can also see the full list of code repositories right here. You can see that I have 295 code repositories.

You may or may not when you're looking at this see the same amount because some of these are private but it will show you all the public ones I'm working on and then it gives you just some basic overview items.
Now I will say that if you want to get a developer job one of the most common things that the hiring partner is going to ask you is if you have a GitHub account and they're going to want to see your profile because that is a way where they can log in and very quickly see exactly how you write code. So it's something that is very important and it's also free to use so I'm going to go through the process of creating a GitHub account just so you can see the entire process.
That's one side of it the other side is you have to install git on your system. And I also want to make it clear that git and GitHub are two different entities git is an open source tool that you can use on your computer you can use on Mac, Windows, or Linux. And so this is the local tool that you'll use.
Now GitHub is a private company and they are a company that simply allows you to store and manage those git repos that you have locally. So if that still doesn't make sense just think that you have to have two pieces of the puzzle to make this work. You need to have the local version of git this allows you to very quickly add versions to your system. So every time that you make a change or a significant change you can track that and if you ever have to switch back then git allows you to do that.
GitHub is simply a storage engine for all of your repositories. And so to start off you can just go and create a username. All of this is free. I'm just going to create a very basic to demo one. I'm just going to say devcampreactcourse and then just type in some e-mail. I'll use devcampreactcourse@devcamp.com and then you need to type in a password and then click sign up for github.
This is going to create the account for you. And it's going to ask the type of account you want I'm assuming if you've never done this before you're just going to want to have a personal account set up with unlimited public repositories for free if you want to have private repositories. What the difference there is with a public repository just like it sounds everyone in the world can see your code and that's perfectly fine as you saw if you go to my profile you'll see that I have a very large number of public repositories.
However, if you're working for a private company or say you're working for a freelance client they might not want their application shared with the world. And in that case then you might want to sign up for private repositories for this demo account. I'm just going to do this and then I don't want to set up an organization and I don't want any updates on this account. So hit continue and you can just we pick out whatever fits for you. It doesn't really matter.

Hit submit and we're done.
The first thing that you're going to want to do when we install git is we're going to click on start a new project but we're not going to worry about that right now. First, we have to install git so depending on what operating system you're following along on simply click on that link it will pick up automatically what operating system that you're working from right here. It knows I'm on a mac so I could simply click this and Ill start installing it for me if the installation does not occur then you can click here to download it manually. And then once you've installed it then you can simply go through the process of the installation and the only thing they have to make sure to do is you will most likely need to restart your terminal when it is done.
So the way that you can check to make sure that this works is if you open up a terminal and you can also do this in vs code if you're here and the way that you can do it is to actually create your repository. So make sure that you are in whatever project that you want to do this. So if you did not delete your TestingTemplater application you can simply say git init and this is going to if it works it's going to say initialized empty git repository and so that means that this is all working.

You might get this little warning and it says that the git repository in this directory has too many active changes. Now we barely have any files in any code, Why is it saying that?

The reason is if you look at your node modules this has a lot of code. It has literally hundreds upon hundreds of libraries and so we don't actually want that. And so one of the very common practices you are going to see is the ability to have what is called a git ignore file. So if you just come here. Just at the very root and you can hit new file. Also if you're following along in the terminal you can just say
touch .gitignore
and it's very important that this has a dot right in front and so what this is going to allow us to do is pick out which files that we want stored on that remote repository and which ones we don't. We definitely do not want our new modules up on that remote repository because they have way too much code and there's no reason to do that. One thing that you're going to see the more that you build out reactor really any kind of javascript application whenever there is some kind of conflict and you have a dependency issue you can simply delete your entire node modules directory reinstall and everything will get up and running again. And so for that reason you wouldn't want to store that on your remote repository because these are technically temporary they're only needed here locally and then later on you'll see when you would push it up to production. It will regenerate all those for you manually.
If you do touch .gitignore or you simply go in whatever editor you're using and click something like new file. You're going to see that we now have a .gitignore file. Now the first thing that I want to do and actually the very first thing is let me type git status right here.
git status
Now if I type git status you can see all these are in red

It means these are untracked that means the system does not know about them yet git has not been informed of these files.
It simply knows that there are these files here that we've not checked into the repository and if you notice we have node modules here so let's add these to our .gitignore or file. The way we can do that is simply by saying node modules and I'm going to save that. And now let's try this again. So if I say git status and come back up you can see that node module is no longer included.
So anytime we have anything like this anything we do not want pushed up to that remote repo then we can place them here. Now the next thing we're going to do is create our first commit. So what a commit is it is a version it is a place in time where we say I like the code where it's at, at this moment and I want the ability to potentially come back to this version at some time. So I'm going to say git add and then a dot.
add .
This is going to add them all. And now if I say git status you're going to see something different. Now notice how they're all green.

So this means that they've been added to the repository in our little status message has changed. Now it says changes to be committed.
So the way you can commit is you can say git commit -m which means are passing in a message and then inside of quotation marks to say something like First commit.
git commit -m "First commit"
And that's all we have to do, now if you type git status you'll see that it says we're on branch master there's nothing to comment and it's all clean.

Now there are a few words there that might be confusing to you if you've never used git before. Such as, what is a branch? What does Master mean? What does working tree mean? And this course is not on git so I'm not going to go into the details on that specifically but I do highly recommend that you check out this git site right here. I'll place it in the show notes and they have all kinds of different tutorials they have a great book that is completely free and if you don't like doing this in the terminal you don't want to memorize all those commands.
You can download what's called a GUI which stands for a graphical user interface and then you can use git very much like any kind of software package like a mail software or anything like that. And that's completely up to you. I'm simply wanting you to have an understanding of why you'd want to use git and give you the basic tools you need so that each one of these projects you build you can actually have them as part of your portfolio and show them off to other people.
So that is the setup, now let's actually push it up so I'm going to click on start a new project and it says I have to verify my e-mail address. I'm going to say you should have received something like that. Let me bring this over really quick just so you can see. So you should get an email that looks something like this.

And so I'm going to right click and then click on copy link address and the reason why I'm doing this in the incognito mode is because I'm signed into GitHub on my regular account and I don't want there to be conflicts or anything. So it says email was verified.
Now I can click start a new project and I can just call this anything I want. So it's asking for a repository name. I can say reacttemplate and that's really it will be public. We can only use private if you have a private type account. We don't care about any of these other items. Just click on create a repository and then you have a full set of instructions.

Now there are a few ways of doing this and so we have HTTPS or SSH. So what this is is it gives us a couple different safety security communication protocols so SSH you can use but if you do you're going to have to set up your SSH Keys. Now there are a number of guides that you can follow in order to do that and I will set those inside of the show notes if you want to follow along.
But for right now I would say just keep it on HTTPS and then come down to this option here where it says "or push an existing repository from the command line."
So the reason why we want this option is because if you look at the "or create a new repository on the command line" you will see that they went through the first few steps we did that. So we created a repository in our project. Then we added our files our files were already there. They manually added a single file. Then we committed our changes and then you'll notice these last two commands are identical to these two commands.

So if you simply click on this it's going to copy it to the clipboard.

And now if I come down here and paste it into the terminal I can run it and it's going to ask me for this username and for a password. Let me come back and make sure that I have the correct username. You'll see it's up here in the URL so I'm going to paste that in and then I'm going to type in my password.
Now as you may have noticed if you have not used Unix type terminal systems before I was typing my password but it's all hidden and so I typed that all in. Hit submit and they do that for security purposes and so now if I come back and I could hit refresh or just click on the name. Now you can see we have our full project right here.
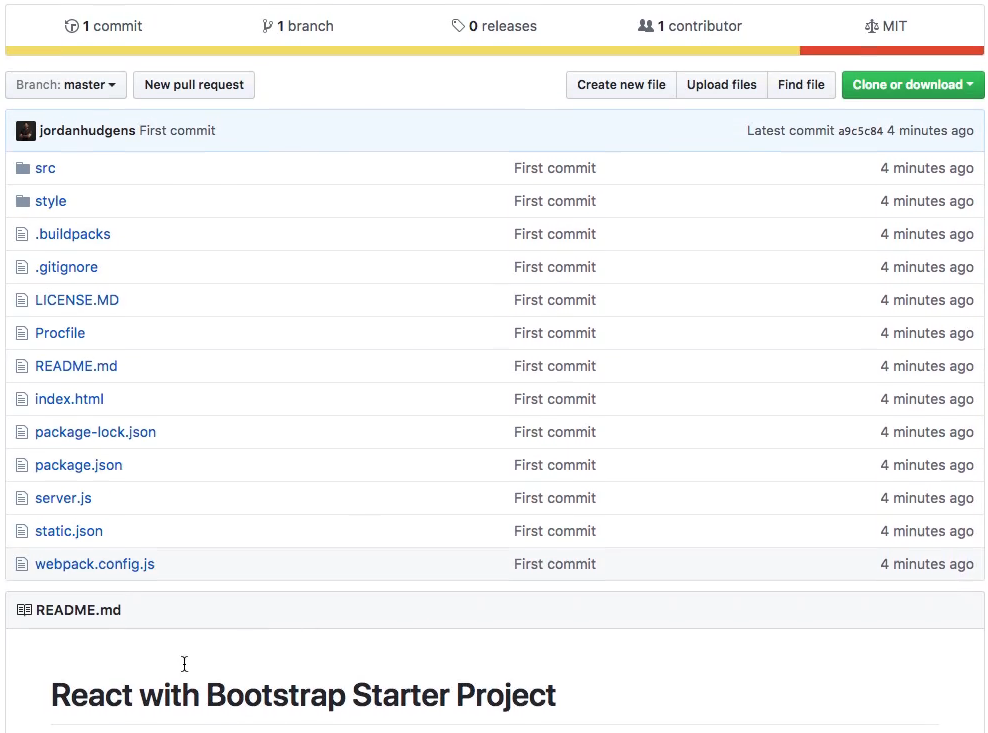
It has a description this is here because it was part of the template starter project. You may also notice we don't have our node modules which is good because we added those to the .gitignore file but this has all of the code in our project and we are ready to go.
So in review what did we do? Because I know that was quite a bit. We created a GitHub account then we installed git on our local system. Then we went through and ran through a number of commands. And don't worry you should not if you've never used this before. It's going to be a little bit challenging in the very beginning simply follow along and go back and re-watch or read the instructions and that should help you to understand the process.
I promise I've been doing this for quite a while. I've had well over 35,000 students go through the courses that I've taught pretty much every one of the courses I've taught git in, just because it's so important and I can promise you it gets easier. So if this is your first time and it feels intimidating and you just don't like any of what we just did.
Do not worry it will get to a point where you won't even think about it you'll just go through it and have all of the commands memorized and in the meantime just take it nice and slow and follow along. So that is how you can get git and GitHub completely configured and set up for building out projects.