- Read Tutorial
- Watch Guide Video
NOTE: Updated information at the end of the transcription.
So that if I was asked to build out some other type of project and I wasn't given the same step by step tutorial that I'd be able to do it because I learned at a conceptual level. And so what we're going to do is at the end of each project section I'm going to pick out some of the most challenging topics from that project and we're going to take what's called a deep dive. We're going to dive into that specific set of topics and we're going to start with a completely different project. We're not going to focus on design or anything like that, all we're going to do is we're going to dissect a few of the most challenging topics that were covered so that hopefully they'll make sense and they'll give you the base foundational knowledge that you'll need in order to continue moving forward.
In this particular deep dive what we're going to focus on are props and state. So those are gonna be when we go through when we build out a new project, those are going to be the topics we're going to focus on. But we're also going to cover a number of other concepts as well, we're going to talk about component-based architecture which I'm gonna talk a little bit about now and then even more in the screencast.
Part of the reason why react and some of these javascript frameworks have become so incredibly popular is because they follow a design pattern. The design pattern is called component base design which means that instead of thinking of an entire program as one giant system you actually change your mindset and you think of an application or whatever kind of system you're building as a series of connected components.
So if you imagine building out some kind of website and that website has five different things on a page it might have some blog posts it might have a sidebar it might have a navigation system. Each one of those elements can be its own component and what that allows you to do is to organize your code in a way where you can become ultra-focused on that one feature. I've seen components as small as a single button and what that allows you to do is to be able to go and see what type of custom functionality do I want to give that button or that navigation bar. And what it allows you to do too is to organize your project in a way where you can go and work on each one of those elements individually.
This is part of the reason why many react projects are considered to be incredibly well written. It's because if implemented properly you can go add a new feature to a system and only have to touch a couple of code files whereas in other frameworks and in other languages you may have to touch 15 different files in order to build out the same features. So it allows you to be very organized with your own development approach.
As we go through the example you're also going to see that I'm going to point out the differences between functional and class components. And so whenever you're working in react you're typically going to be working on one or the other of those components. I'm going to give you a high-level view of them right now and then you'll see some pretty detailed examples when we go through it.
Just at a high level, a functional component is what's called a dumb component not because it doesn't have the intelligence it just doesn't have a lot of behavior. So when I mentioned earlier about that button component many times that will be a functional component. What that means is that all its job is to do is to render that button or render some kind of HTML element on the page it shouldn't have a lot of behavior.
And it also shouldn't have and this is a keyword here it shouldn't have state. If you have a component that needs to have state if it needs to maintain state that's when you want to use a class-based component that's where you can use all kinds of different methods and you can manage state. So if you're building out for example that navigation bar and you need to manage what the current state of the user is,are they on the home page? Are they on the About Us page? Or are they on the reporting dashboard page?
You need to be able to manage that state. State is part of one of the biggest reasons why people use tools like react because it gives you is the developer the ability to track the users behavior as they navigate through the system and also to keep track of different values. So technically even though they never leave the single page because every react application at least every standard one is what's called a Single Page Application.
But as they navigate through all the different tabs and all of the different components of your system you can keep track of it. So imagine you're building out an e-commerce site, you can keep state for their check out items. You can see every time they add a product into their box, you can keep track of it and follow them throughout the entire site. And that gives you a lot of flexibility you can maintain there check out items, you can maintain how much they've currently spent on the site, and take them all the way through the checkout process that's how you're able to work with state.
That's the key difference between functional components which simply render a component they just render some HTML on the page, versus a class component that has more advanced behavior. And lastly, we're going to discuss the word this the keyword this. I know and don't worry this is not going to be the only deep dive we discussed this.
When I've spoken with the Bottega instructors and ask them what is one of the most challenging concepts for everyone across the board. The concept that came up the most was the keyword this so I'm not going to make a deep dive dedicated only to it. I'm going to discuss it pretty much in every single one of them so that it starts to make sense.
Part of the reason why this is more confusing in react is that react works slightly differently in its behavior with it then even in just vanilla javascript and so we're going to work through exactly what that looks like how you can use it and hopefully you'll see that it's incredibly powerful and it is intuitive after you've practiced it enough. But it does not make sense right away, when I was teaching myself react I struggled with learning this so you should not feel bad if you found that as a challenging concept.
I have spoken with many developers from junior all the way through senior and I've gotten different explanations for what they think this is so there's still a lot of confusion around it. So hopefully by the end of the entire course and all the deep dives and all the projects that Max goes through you're going to have a very solid understanding of how it works and how you can use it in your own systems. So now that you have a good idea for what we're going to cover let's dive into the code.
Now that you have a high-level understanding of what we're going to cover in this deep dive. Let's get into the fun part which is the actual code in the project. I have the finished project right here it's going to be very basic. It's going to be very ugly from a design perspective but hopefully, it's going to help you understand these concepts.
The topics we're going to cover are props, I'm going to discuss a few React tools that you can access, I'm going to talk about state, the keyword this, functional vs class components, and then component-based architecture which also includes code organization.

So I include a link to all of this code in the show notes so that you can access it. Now before we get started on anything I'm going to actually jump to number two here which is to install the React developer tools. Now I do not have these already installed in this virtual box so I thought it'd be fun to save that for here. So I'm going to just say react tools chrome browser and this is just going to be a browser extension.

The very first one here React development tools is the one we want. So click on that and obviously if you already have these installed you can skip ahead, I'm going to add these to Chrome. It's going to ask if I want to add the extension

Also there are a couple different versions of this. Make sure that the version you're getting is the one that's offered by Facebook. Facebook is the creator of react, so I'm going to trust their tools over anybody else. So click on add extension and this has been added to the tool set.

This is incredibly helpful when it comes to performing debugging or anything like that so you can that we have our little React tools icon here and it's only going to pop up whenever we're on a application that actually uses react.

So now that we have that, make sure that you already have the devcamp-js-builder installed on your system, that's the tool that we're going to be using. It has a number of basic settings if you do not have it I'll also include it in the show notes.
So let's get started and let's generate the application. So I'm going to have another application running in the background I'm gonna get rid of that one and I'll make this little bigger so it's easier to see and you can place this project anywhere you want. I'd say for you make sure you put it in a spot where you can reference it later if you want to see some of these concepts in action.
So I'm going to say js-generate so we can build this completely from scratch and it's going to ask me what type of application I'm going to go with. And I want to go the react skeleton.

This is a much more basic version it doesn't have redux it doesn't have bootstrap it doesn't have anything like that. So I'm gonna start off with the skeleton it's going to ask me the app. You can't see it because I have a bad font color choice right now in my terminal but I've gone through this a few hundred times I know it's asking me for the app name so I'm just going to say deepDivePropsState and then it's going to go build that for me.
And so let's change into that directory and then type npm install to install all the dependencies. Now, whatever speed of internet that you're currently on this may take a few seconds to a few minutes so of best for it until it's done.

OK look's like every thing installed properly. So now I can just say npm start and this is going to startup the application and it is going to be at localhost:8080 as you can see with some of the outputs.

Let's navigate there in the browser so go to localhost:8080 and you may also notice that now our little React developer tools are now working.

So this means that that installation work properly and now if you open up the terminal or the console here in addition to that now you're going to see a new button over here called react. And this is going to give you access to a much more react friendly kind of environment.

So this is where we're going to be able to see our props and see what our state is and all of those kinds of things. This is a good starting point but now let's actually start getting into the fun stuff, I'm gonna open up Visual Studio code and let's open up a project come here open folder.

Let's go to the desktop and we have deepDivePropsState and this is just going to be our basic react skeleton.

and so click on src for source, then components and we have our app.js just to make sure that everything's working with our server and our live updates are working. Let's update the title so this is going to say React, Props and State Deep Dive. Okay, hit save switch and everything is updating live.

And one thing that I like quite a bit is that we have access to the virtual DOM right here in the react section of the console. Now the virtual DOM is going to be something that we talk about quite a bit over not just this deep dive but pretty much every single one. And it's because if you're not that clear on it the DOM which is what you have access to in HTML.
The Dom stands for the document object model, if you're on a regular website like if you're on github this is using the real DOM and that's because that's all the browser knows how to understand. So we have the entire body we have HTML we have all kinds of objects here we have h1 tags and these are all document objects. And with react it's a little bit different, we don't have access to the actual Dom or I should say we shouldn't touch the actual Dom. You could override the default behavior but it's highly discouraged and we'll get into why later on.
But what this gives you access to is the virtual DOM. So right here you can see that we have our app component.

This is the main app component for the entire site so our entire applications wrapped inside of it. And then we have a div nested inside of that and then inside here we have an h1. You can see our little breadcrumbs here and this shows you your virtual DOM. This gives you what react does is it takes all your components all of the different elements that you're putting on the page and then from there it allows you to work with those and then it will automatically update the real DOM in the back end so it's going to do all of that for us.
And so you can see right here that we have props and children of REACT props and state deep dive which is what we have here.

So props even though usually they are something that you're using where you're declaring them by default right here this h1 tag without us doing anything already has props as these props and that's short for properties. And many times especially when you're learning something from scratch I like to actually use the full name so props can seem a little bit confusing if you've never dealt with them before but it just stands for properties.
It means that this h1 tag that we've selected has a properties of children and inside of there we just have this string and at the end of the day, kind of at its most basic that's all props are so if you find them intimidating or the key word a little bit confusing just realize it means the properties of that component.
So let's go now and let's go and start building out this application a little bit. What I want to do and this is going to be very basic is I want to build kind of a journaling application. We're not going to get into inputs or forms or anything like that. We're instead going to focus on how we can have multiple components and how each one of those components can communicate with each other via props and via state.
So let's start out by going here to Visual Studio code and I'm going to initially call a journal entry I'm sorry a journalist list we'll get into a journal entry later. But so what I'm going to do is I'm going to say import and then we'll say journal list from and this is where I also want to show you some things revolving around coud organization and different things like that. So I'm gonna say from './journals/journal_list'; so this may be a little bit odd because you may think well where does it know how to get that journals directory, how does it know about this path?
Well, that is what we need to create and that's the other thing I want to show you is that our code organization is completely up to us we can separate things out however we want. Right now we're in the components directory and so if I have an entire feature like a journal's feature like we have right here I think it makes sense to nest this. So here I can create a new directory called journals and then inside of here I can create another file.
So here I'm just going to call it journal_list.js and that is going to be our first component so we're going to create a journalists component and that's going to have the majority of our projects behavior and when we talk about props and stay this where the magic is going to happen.
So inside of journal_lists we first need to import React. Anything that you do any file that you create that has react code such as jsx or any type of component needs to react in it. So I'm gonna say import react and then I can say component and then from there from react.
journal_list.js
import React, { Component } from 'react';
And also I wanna show you something pretty cool. If you've ever watched any of my videos on working with visual studio code and you are tired of typing this type of code out for each one of your components you also can say rc and this is not going to be built into yours unless you've done this yourself. But inside of my user snippets I created a custom snippet called rc and you can see right there it says generates a basic React component

and all I have to do is type rc and it does the rest for me. If you have not watched any of my videos on how to create custom snippets with visual studio code I highly recommend that you do that so it's just a way of being able to be really efficient. But if you'd like typing all this stuff out by scratch each time then please definitely go ahead and do that. I don't want to though so I want to create a journal list component.
Now one more note here I'm going to make, I'm gonna make it as a comment. Is that this is a class component, later on we're going to see that we can also utilize other types of components they are also called state lists, they're called dumb, I personally like calling them functional components and so they are what you use when you just want to render a component on the page.
But for what I want to do here we do need to work with state and so that's what we're going to do is we're going to make this a class component and later on you'll see the difference between the two. So we have this journal list component and something else that we need is we need to have some data so let's add some data here I'm going to add this outside the class. I'm just gonna add a const and let's say rawJournalData and this is going to be an array of objects.
So I'll say I want the title to be post one and then I want the content to be post content and then I want to have a status. And so it will make this to be draft and let's create three more of these blog post one, post two, three, and four no difference here. I only want one of these to be drafted and the rest of them I want to say publish.
journal_list.js
const rawJournalData = [
    { title: 'Post One', content: 'Post content', status: 'draft' },
    { title: 'Post two', content: 'Post content', status: 'published' },
    { title: 'Post three', content: 'Post content', status: 'published' },
    { title: 'Post four', content: 'Post content', status: 'published' },
]
You'll see why in a while we're going to be able to use state to update these values.
OK, so far so good. We have some rawJournalData this mimics very closely what you would get from a API call. So when you get to the point where you're calling outside API's this type of data is going to resemble what that looks like, so that's what I've done here. Usually in a production app you'll be calling this from some API. You'll most likely use redux or some type of tool like that in order to get access to it. But for right now let's just hard code it in.
So now that we have that in place let's build out a constructor. So I'm going to create a constructor function here and it is going to take props in and we're going to see what that means here and a little bit. And whenever you're working with a constructor you need to call super on that and just if you are not really familiar with what super means. Super means that because our journal_list extends component what that means is that our journal_list may look like a class just a plain vanilla class that we've created.
But it's not, because it extends component. That means as access to all kinds of cool features and methods that exist in component. So it's a little bit better or more accurate to say that a journal_list is a type of a react component. So whenever you call super what you're telling the journal_list to do is to go up to that parent class and go up to component and then make sure to bring down any of the default values or anything that exists in that component down into the journal_list.
So now that we have that let's work with some state. So I'm gonna say this.state equals and let's add a couple state items. State is just a normal object inside of react and so I'm gonna say journalData and for journalData what I want to do is I want to call our raw journalData up here so I can say rawJournalData and then I also want and you'll see what I'm going to do at this later on. I'm gonna say is open and I'm gonna set it equal to true. Because later on what we're going to do is we're going to build a set of buttons that will show, hide, and toggle all of this data.
journal_list.js
export default class JournalList extends Component {
    constructor(props) {
        super();

        this.state = {
            journalData: rawJournalData,
            isOpen: true
        }
    }
  render() {
      return <div />;
  }
}
And so that's going to be something that I think will hopefully show you how straightforward it is to work with state with react. So we have all of that set now let's go down and let's go into our render function. Now, one other thing I want to point out if the terms like constructor and render are not very clear to you we're going to have a deep dive in the very next section where we walk through all of the lifecycle hooks and lifecycle methods that react has.
And so when we do that we're going to walk through exactly what these do and when they're called and how you can use them. So for right now just know that the constructor is a method that's automatically called. So when you create or when you call this journal_list it's going to call this constructor, it's going to call super then it's going to set the state with these default values, then it's going to call later on it's going to call render and it's going to show something on the screen.
So for right now let's make something just really basic just to make sure that all of this is working. So I'm just going to add an h2 here and say hey and let's close it off. OK, and that's it.
journal_list.js
render() {
    return <h2>Heyyyy.</h2>;
}
So this is a very basic kind of component. Nothing is going to be shown on the screen yet, as you can see right here we don't have anything.

And that's because we need to call this component. So right now this file doesn't do anything. It simply is a blueprint for a journal_list. So let's call this journal_list. So now let's come back into app.js and right under the h1 I'm going to call journal_list and make sure you call it just like this and where you have the slash and then the ending bracket there
app.js
return (
    <div>
        <h1>React, Props, and State Deep Dive</h1>
        <JournalList />
    </div>
);
hit save come back here and it looks like something broke. Let's see what it is. So now that I click console if I scroll up here it's going to give us all the errors that happened. So there are quite a few of them, it says warning react class element type is invalid expected a string or a class function in the render method of app.
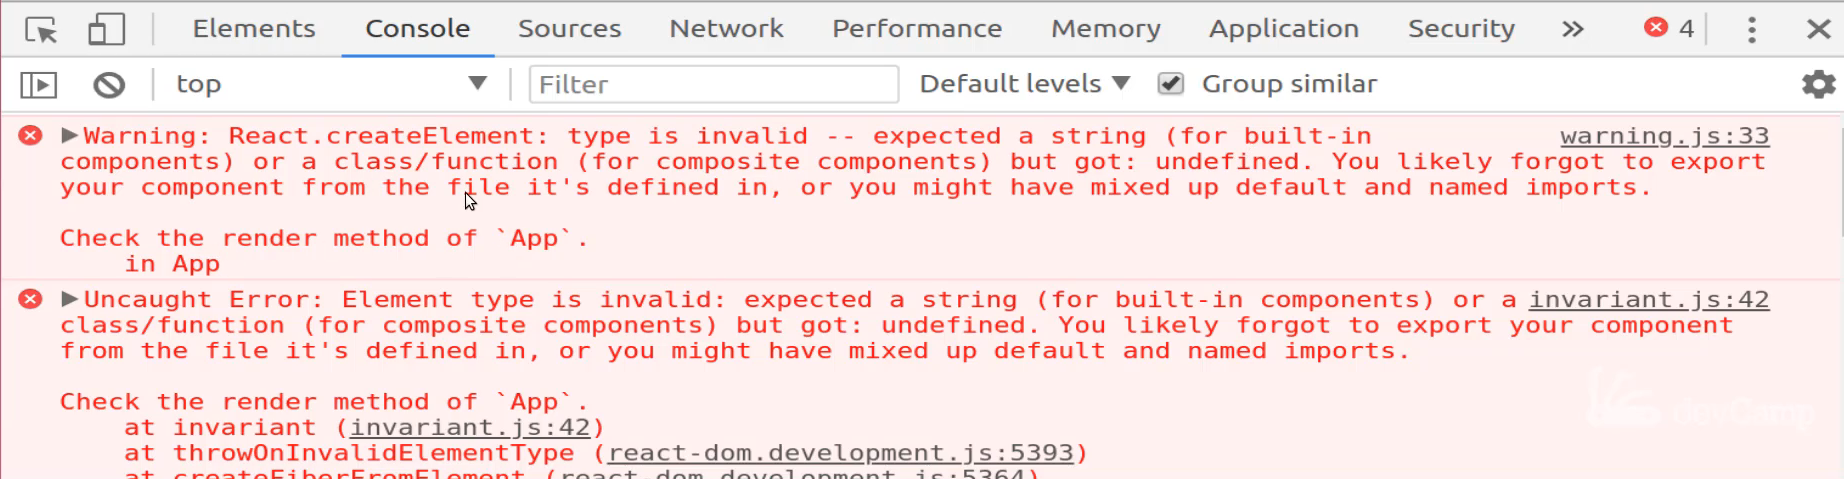
So let's see exactly what that is. And you also have some other descriptions you likely forgot to export your component from the file. OK. Well that kind of tells us something right there. Coming over here to our journal_list.js you can see we have export default class JournalList extends Component so everything there looks like it's working properly. We have our return method and everything there is working we have render. So let's come to the app.js and let's see what could be the issue here. And it looks like the issue, and this is will be something we'll talk about later, is that when I imported this journal_list I used these curly brackets and I shouldn't because that is not necessary because when you say export default this class name right here is automatically assumed.

So when I said export default class JournalLists and I named the file journal_list, app is going to take that name and when you import it you only need to have it just like we have it here, as you can see, that's the same thing with React. I'm actually glad we ran into that here because you may wonder what's the difference. Why do we need to put component in curly braces but React doesn't? It's because react is exported as the default. Kind of like we did with The JournalList. Later on I'll show you how you can export something without making it the default will do that for functional component.
So let's see if that fixed the bug. So yeah there we go. So we are back to working code right here.

It says Hey so all that's happening here is it's rendering that.
Now let's play around with this a little bit because it's kind of boring. We have this Heyyyy but let's see if we can access the state. That's kind of what this deep dive supposed to be about. So I'm going to add a div here and inside of this div I'm going to say this.state. Let's say yeah let's do the journalData.
render () {
    return <div>{this.state.journalData}
}
Now by default this isn't going to work actually because the reason why is because you can't just render a data collection like this and I'll show you the error you get whenever you try to do this just in case you do run into this yourself. So if you come back here and try to refresh nothing's happening so you get this.state.journalData you're calling it in the app but it's not actually working.
Right now our JournalList is not passing any kind of props or anything which is fine but if we come over here let's actually just grab something else in state. So here let's add a greeting, I'll say 'Hi there', this is our greeting and so now I can call this.state.greeting. And now this is going to be what gets returned. So if I hit save it's still not showing up we're still getting that hey which is kind of weird behavior.

If you ever have that happen just come over here and let's just restart the server. So let's do npm start again and let's see if that fixes it. Because we should have gotten an error before and there we go, so now it's working.

I'm purposefully leaving a lot of these little bugs and errors inside of these guides because I'm assuming if I run into them then you will as well. And so instead of you having to spend a ton of time debugging those you can just remember back to these type of videos and you'll realize what you need to do in order to fix those so sometimes just rebooting the server is all you need to do.
So right here we have Hi there and that's kind of helpful. I mean that's slightly better than we had before when we just had something hardcoded in but we can do better. So this is state this is what gets set whenever we just create and we call this JournalList.
So what we can do though is now let's talk a little bit about props. Don't worry we're not done with state yet we're still going to have a lot of discussion on it but what I want to do now is let's have a little introduction on how props work. So here what I can do is I want to pass a heading in so I can say heading equals and let's call this first one our JOURNAL LIST 1 and hit save.
app.js
<div>
    <h1>React, Props, and State Deep Dive</h1>
    <JournalList heading="List 1" />
</div>
Now if we switch back into the browser nothing gets changed here and that's because we're not calling our props yet but let's go into our react tools and open them up and now see if we have access to those prompts.

So now you can see our virtual DOM looks a little bit different. We have our JournalList now and here on the right hand side this is looking much better. This has some pretty cool data inside. Right now you can see our properties are heading list 1. Remember that's exactly what we called in our app.js so when you call a component like we're doing there and you pass it some value like heading but this could be anything you want if you want to do something. So if you just wanted to call it asdf and come back here and if you come back and inspect that same item. Now you have a prop called asdf.


So you have complete control over this prop and the name I personally like the term Heading because that's how I'm going to use it. But now that you have this how can you actually use it? I mean we can see it in the react tools which that's kind of helpful but that's not exactly what we're looking to do.
I actually want to render list one right here. So in order to do that we can come back the code and come to the child component. Now journal_list is a child component because it's wrapped inside of this app component. So app is here and then this is a child component inside of here. So let's come over here and let's see exactly how we can do that. So if I say right here instead of this state greeting let's say that I do want to change this to an h2.
I can say this props and then heading now if I save we have access to it. So you see that's how you can pass data between one component to another. One of my big beliefs when it comes to development is that if you can learn how data flow works in an application and in a framework or a language then you can learn anything in that framework or language.
And so right here understanding how props work is really going to help clarify the rest of the entire react system because right here as you can see we were able to take a piece of data which is a heading title and then pass it from a parent element a parent component here into another one.
Now the last thing we're going to do before we take a little break and then come back and finish up in another screencast because I know this has already taken quite a while and each one of these deep dives do take a while I will give you that is a little bit of a caveat but I promise you they're worth it these are going to really help solidify some of the more challenging concepts in react and so hopefully you will be able to learn a lot from them and they will be worth your time.
Now the last thing I want to talk about and it's connected to props is the component architecture. So part of the reason why using React has become so popular is because it allows for you to pass around components in a very modular way. So let's see what happens if I create another component here or I call another component and so I'm gonna just duplicate that line.
But now I'm gonna say List 2 for the heading, so if I save this now and come here. Now you can see that I may have two components but they actually are completely different components.

You can see that when you come and inspect them you can see now that we have two journalists and the way that react treats these is completely separately. So in other words if we were to make changes to this specific JournalList then what would happen is only that items or those sets of items would get updated and lists 2 here would be completely ignored and that's exactly what you want because you want to be able to treat these independent of each other.
And so this is when it comes to understanding what component based architecture is this is really what you need to know is that you have the ability to pass components around the entire application use them, reuse them, have multiples on the same page and you can treat them all uniquely. And so that is something there's a very powerful tool in the software development space so I would highly recommend work through that play with this code quite a bit until it solidifies in your mind and that's going to help you quite a bit on the rest of your react learning journey. Right now we're gonna take a little break and then we're going to come back and we're going to keep on going through this deep dive.
Resources
devcamp-js-builder / react-skeleton update
The react-skeleton template webpack needs to be modified. In the webpack.config.js file, modify line 15:
presets: ["react", "env", "stage-1"],
Additionally, run the following command in your terminal in the project directory:
npm install --save-dev babel-preset-stage-1