- Read Tutorial
- Watch Guide Video
The first thing we need to do is pass this formData into our action creator. I'm going to say:
requestsNew.js
  onSubmit = fields => {

    const { title, body, image } = fields;

    var formData = new FormData();
    formData.append('title', title);
    formData.append('body', body);
    formData.append('image', image);

    console.log(title, body, image);

    this.props.createNewRequest(this.props._id, formData, () => {
        this.props.history.push("/dashboard");
    })

  };
Now we have access to it. Let's head over to our requests.js under our actions folder, and let's console.log formData instead of fields. So let's say:
requests.js
export function createNewRequest(userId, formData, success) {
    const token = localStorage.getItem('token');
    console.log('token: ', token);
    console.log('userId: ', userId);
    console.log('formData ', formData);
Let's print this all out. Add a title, a description, let's get an image, let's hit submit, and you'll see now that we have our formData, our userId, and our token.

Now, with the way formData, you can't just you can't just console.log it. We're just going to trust that it's there. We've been through it. We know that we have the data, we have the title, we have the body, and we have the image.
I'm going to get rid of all these, and let's pass them through. Let's uncomment our request and put in our headers, so let's say:
requests.js
export function createNewRequest(userId, formData, success) {
    const token = localStorage.getItem('token');
    return function() {
        axios.post(`${ROOT_URL}/requests/new`, formData, {
            headers: {
                'Content-Type': 'multipart/form-data',
                authorization: token
            }
        })
            then(response => {
                console.log(response.data);
                success();
            })
            .catch(err => {
                console.log(err);
            })
    }
}
Now, we're passing in our formData, we're passing in a set of headers, and we're getting a response and we're catching it if it goes wrong. If all goes well we'll get response.data. That will go to us, we'll hit this success, and we'll go back to our thing and push us to dashboard.
Let's comment out this callback because I want it to only console this. I don't want it to go anywhere else and potentially log something else.

Let's just have the response be console.log(response.data). Let's log in, go to requests, make a new request, let's say fix this and this is broken. Let's select an image, and let's hit submit. You'll see it says then is not defined.
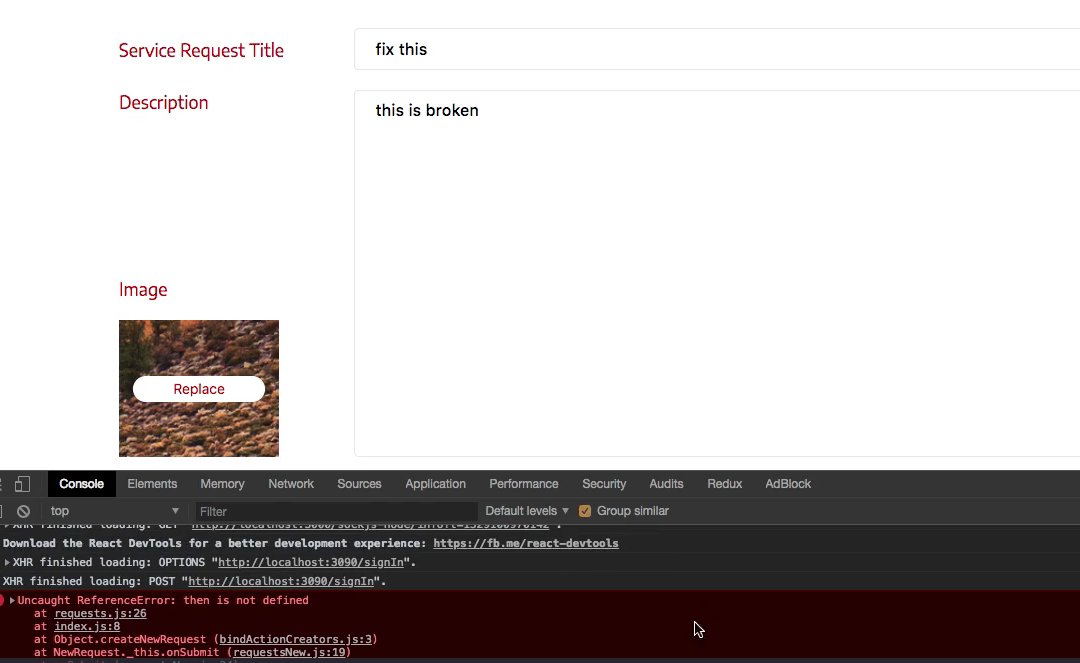
That's a problem with our code here. We said then not .then. What this means is it didn't work, but it probably sent this to the server, which means it probably did something. We're not going to worry about it. We might just have a couple extra things on the back-end that we didn't know about.
Things that we didn't think we created, like a couple of extra quests, which doesn't matter. It's actually a good thing. It will give us more data to work with when we pull it. Let's try this again. Let's hit log in, go to requests, add a new request, let's say title goes here and description goes Here, choose an image, and let's hit submit.
You'll see it says: success message saved request, so it saved to the back-end.

Let's go into our terminal now, and where we were typing out all these db.requests.count(), let's type out db.requests.count() again. You'll see that I have 3 now, so indeed it did create one when it hit that error. It still created it, we just didn't get a response back because our code was broken on the front-end.

Now, let's read them. Let's say db.requests.find(). You'll see we have 3 of them. I have 1 of those because I put 1 on when I was developing this application the first time, and then we just built 2. You're most likely seeing 2.

There is a chance that you're seeing one. You probably typed out the .then and you didn't get an error. So you either have 1 or 2 or however many you created. It doesn't matter, the important thing is that we have 1 on the backend.
We need to have at least one. I'm going to zoom out so we can get it all on the line. You'll see that we have all this data. It's really hard to read straight up, but just see that there's an _id, there's a title, title goes here, we just typed that in. Body and description goes here and date.

We got a date because it creates that on the back-end automatically when we create it. We've got an imageUrl, that's an important one, and then we have "status" : "pending". They are always pending when you create a new one. That works great.
Now, we just need to make sure that it pushes us back, so let's uncomment success. Let's save the file, and let's go to requestsNew.js. This should push us back to the dashboard. That's all good. Let's go to our application log in, and let's create a new one and see what happens.
Let's say This is a fourth request , and cool stuff. Let's select a different image. What I'm going to do is I'm going to take a screenshot of this blue folder, so that the image looks different. I'm just going to select that folder.
If you are on a Mac, and you want to know how to take a screenshot. It's just command + shift + 4. Anyway, let's choose a different image, that's the point here. I'm going to hit submit, that will create another one, and bring us back here. So that's all good.

Let's go to requests. Now, we don't really see these pieces of data. We just see all these hardcoded things. What we need to do now is check this, and let's see if it added it. You'll see there's an extra one, count it, there's 4.

Now what we need to do is develop a fetch request. We need to develop another action to request these. We need to fetch them now. We need to hit a different endpoint, get these items, and throw them into our front-end so we can actually have the items.
Then we'll be done with the requests once we filter them, which will be easy. Let's commit our code, and do that in the next video. Let's say git status, git add ., and let's say git commit -m "successfuly implemented new request feature". I'll see you in the next video.