- Read Tutorial
- Watch Guide Video
If I click on the design and I click on that link

it takes me to this design here on Envision, so this is what the application will look like.

that FPO: Complete Status is not going to be in the application, its a part of Envision.
So basically this is the start of the application. If I click down here you can see that there's basically one page but with different content

Now you could implement that you can have different pages but part of the reason we are using react is so we don't have to use different HTML pages, it all injects into the same HTML file. So the Idea of the application is you choose a date such as your birthday. In this application It has one pre-selected date so if you're using this calendar drop down you won't be able to select a specific date it's always going to go to this date.
Then once you click a date you hit generate then it generates a countdown and then it will be actively counting down. Now, obviously it's not here in the design but we're going to make the application do that. Again it is just a design if it were fully functional there would be no point of building the application, that's why it's limited.
So you'll see that we have all these wonderful skews here and we're going to have to somehow put these on the screen obviously because we are building the app. Now there's a number of different ways we could do this and one of them is using skews which is transforms, one of them is using clip paths, and I'm sure there are a bunch of other ways we could do it, such as rotations and all that other junk.
Now, the way I want to build this application with the skews is by using CSS grid. If you go to Google and you type in CSS grid, and you select this first link from CSS tricks "A Complete Guide to Grid". You will be brought to a very in-depth guide to grid. And we'll be referencing this through out our application, so I recommend opening that.
Now I'm going to close this trello board, well the first thing I want to do is go through a few things on this Birthday Countdown card and then I'll close this page. So we have our design we checked on that, and we have a UML diagram so let's click on that and look at it.

So we have birthday countdown thats our app, we submit a date we render the countdown to the date. Okay so if you want to look at that as we build it feel free to do so I'm not going to look at that from here on out because it's a little self explanatory.
Now the symbols might be confusing, by basically just read this UML diagram and it will make sense so I can start here, you submit the date, and then it renders the countdown to the date. So basically the idea is it's going to continuously be rendering our page.
Now, if that didn't make sense and if you're really confused by this little UML diagram here don't worry about it, as you get more experience with UML diagrams it will make more sense to you. If I click on user stories we basically have the set of action here, or a process that we follow for how the application is supposed to be used.
It says user can select a date from a date picker, system generates a live countdown until the date is reached, the system should render that the date has been reached. Basically its pretty self-explanatory, you select a date and then you hit generate and then it continuously re-renders so its counting down with a timer and then once it hits that timer it will render this happy birthday.

Basically, the main concepts we'll be learning here is CSS grid, clip paths for the skews, how to use third-party libraries such as react and a date picker library for react, npm, and basically timers in JavaScript, and the date object, and a little bit about react components, and the component lifecycle.
Okay so if that went over your head don't worry about it, you can go back and re-watch what I just said or you can just move along with the application which is what I would recommend because you will come to understand what we're learning as we build out this application.
So let's go ahead and go back to this trello board and I'll look for any notes we have. Okay, so we have the form and the count down, again this is kind of like a site map or UML diagram type thing. So don't worry about that, and let's look at the application summary.
So show a countdown of the days, hours, minutes, and seconds until a birthday. So basically that's just a rough explanation of the application with this Trello card here. Now this is a pretty useful tool(trello) and we'll actually be building a Trello clone as the very last app called DevWorkFlow.
I wanted to show you that, not because it has anything to do with our current application but just so you know that Trello is a good tool. If you want you can go create a Trello account and maybe create your own boards for this if you want but this is the last app that we will be building in how ever many weeks it takes to get to this application.
So we are just going to be building the birthday countdown app, lets go ahead and generate our project now, I'm going to go ahead and close out of the trello board now. I'm going to leave the grid open and I'm going to look at the design and I'm just going to open up my terminal by hitting command and then space bar and searching terminal.
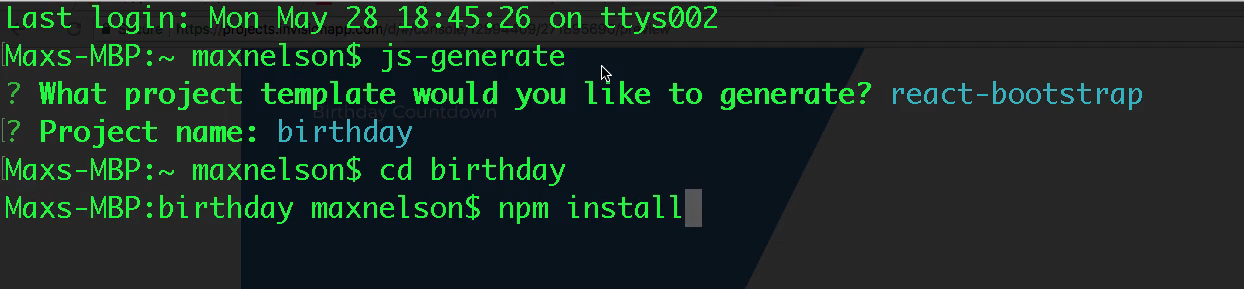
So in your terminal, go ahead and navigate to where you would like to save this project. And what I'm going to do is say js-generate and if you don't have this installed go ahead and install it, though you should have this installed by now especially if you were able to go through the last app.
In this guide I'm going to select react-bootstrap

and I'm going to call it birthday and then we are going to want to cd into birthday, and then type in npm install.
We'll instead of typing in npm install i'm just going to open up my text editor by saying code . and do it in the built-in terminal.
Now, if you're using a text editor such as Sublime you should type in npm install in the terminal here to install your node modules. If you're confused by what I'm saying just hold up, and I will show you. Okay, so I opened up my text editor, I'm using vs code which I highly recommend, you don't have to use it but I highly recommend it.
And basically what we want to do in here are a couple things, we want to introduce a .gitignore file and we want to install our node modules. Now it doesn't matter if you do that first but it will prevent an extra step if you type git ignore first. Now go ahead and open this up, if you're using sublime
use the terminal and type in open . and that will open this up in your text editor.
Now, if that didn't work or you're on windows just go ahead and find where ever you placed this project on your computer and open up the folder and get it in your text editor. So if you're using sublime get your project open and you might have to drag the folder to your text editor icon in the bar down there just make sure you get it open.
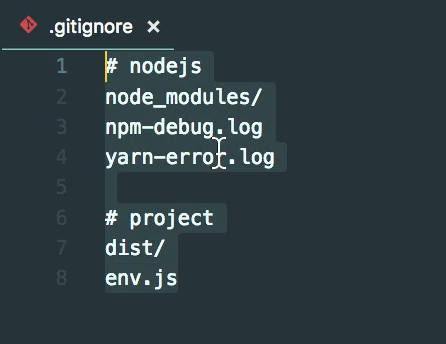
Now once you have it open in your text editor go ahead and and find the .gitignore.example file and you'll see it contains a few items in here and the one I'm specifically focusing on is the node_modules one. Now, the reason we need to put this is because once we start using git we're going to want to put our projects on github so we can store it some where and maybe have people contribute to it.
So what we want to do is change this file name from .gitignore.example to .gitignore. Now this file will be in effect in git, so lets go ahead and install our node modules. So lets say npm install and then once thats complete we'll move on, I'm going to close out my terminal because moving forward I'm just going to use the built in terminal from VS code.
Now, if you're using a text editor like Sublime Text or one that doesn't have a built-in terminal you will have to switch back and forth between whatever you are using and the terminal. Now thats not a bad thing, its just a personal preference, if you want to do that go ahead.
I'm just being extra clear so you know that if you're using one of those text editors you'll have to keep your terminal open. Because as you can see I'm going to close mine right now.
And you will see that our npm node modules have finish installing now if you have some warnings you don't need to worry about those but if you have any errors you will want to take care of those. So go ahead and pause the video and ask for help if you have any errors, or what I recommend is that you try to find the solution before you ask for help but if your in class don't get to far behind.
Now, what I want to do is just clear my terminal and type in git status and you'll see that it says fatal: Not a git repository. So what we need to do is say git init and that will initialize it as a git repository. Now what a git repository will allow us to do is put this project on github, so go ahead and say git status now and you'll see that we have a list of files.

Now if you didn't change .gitignore.example to .gitignore you will see that it contains these files as well.
Now just to be extra clear on what I'm talking about I'm going to change this file name to .gitignores that way it wont realize this is a gitignore file, and you'll see that you get an error here or a warning.

And you'll see up in here if you are using VS code or Atom or something and you'll see that it says 5k

because its trying to allow us to push all of our node modules that we installed up to github, which is not a good thing because that's just so much code that we don't want to push up. So if you type in git status with our gitignore named wrong you'll see it includes those files.

So .gitignore basically ignores these files from git, now if you don't fully understand git just keep going and you will get it more and more as you use it. I encourage you did some research outside of this video outside of course if you are struggling with git because it will help you. So I'm going to remove the s on my .gitignore so that its just .gitignore. Then I'm going to type git status and you will see our node modules are not included in here any more.

But you'll see that the 5k in VS code is still here, now if you're not using vs code with a built in source code don't worry about this step. Basically what you are going to want to do is refresh and it will say okay what have we actually go to change.
And you will see that it reduces from 5k to 21.

And thats just one of the biggest reasons we want to use .gitignore to ignore the node modules is just because of the number of files that we actually want to push up, we don't want to push up a bunch of that you can simply install running npm install.
Another reason is that code is going to be outdated because these node modules are being updated by other developers. Because in our package.json if you navigate there you'll see down in dependencies that we have all of these dependencies that are basically third-party code libraries that people are developing to help our applications.

So by adding our node modules in the .gitignore and just saying you have to run npm install when you download the code to install these dependencies it makes things a lot more maintainable.
Now, what I want to do is get our server up and running and then view it in the browser so let's type npm start, and then it's going to boot up but you will get an error if you already have something loaded up on localhost:3000
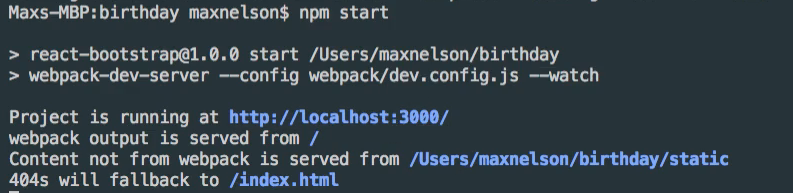
Go ahead and close that app if you are, but it should be working for most of you. Okay so go ahead and go to your browser here and open up localhost:3000 and you'll see that is says DevCamp React Starter and then in the tab bar it also says DevCamp React Starter.

So what I want to do to end this video is just go into our code and change that so the first file we need to go to is in src/components/app.js. And this is basically our starting point, now if you go to bootstrap.js you will see where it says ReactDom.render and then it has < App /> in there.
Now thats a component and we're importing app from components/app. So that is how we are getting it into the app wrapper which is this right here in the function main.
bootstrap.js
function main() {
    ReactDom.render(
        <App />
        , document.querySelector('.app-wrapper'));
}
Now again, just to be clear this app component is coming from the app.js file. So lets go ahead and change the text in app.js to Birthday Countdown.
app.js
import React, { Component } from 'react';

export default class App extends Componet {
    render() {
        return (
            <div>
                <h1>Birthday Countdown</h1>
            </div>
        );
    }
}
Now, lets go back to bootstrap.js and just talk about this.
bootstrap.js
import React from 'react';
import ReactDOM from 'react-dom';

import App from './componets/app';

import 'bootstrap/dist/css/bootstrap.css';
import './style/main.scss';

function main() {
    ReactDOM.render(
        <App />
        , document.querySelector('.app-wrapper'));
}

document.addEventListener('DOMContentLoaded', main);
You will see that it says document.querySelector('app-wrapper') so basically it's taking app which contains the birthday countdown h1 and it's throwing it into app wrapper in the bootstrap.js file. And you might be wondering where is app-wrapper?
If you've done any HTML or JavaScript just raw JavaScript, or raw HTML together, you might recognize what this is but you'll be wondering where the heck is the HTML file, because we're in a JavaScript file. How are we using document.querySelector on anything?
So basically where we're using this is in static/index.html you'll see that we have div class app-wrapper and that's where its putting our component basically, that's where its putting this h1 from our app.js. So if I go to index.html you'll also see that we have title.
index.html
<!doctype html>
<html>
<head>
  <meta charset="utf-8">
  <meta name="viewport" content="width=device-width, initial-scale=1">
  <meta http-equiv="X-UA-Compatible" content="IE=edge">
  <link href="https://fonts.googleapis.com/css?family=Alegreya|Montserrat|Roboto+Condensed:400,700" rel="stylesheet">
  <link rel="stylesheet" href="https://use.fontawesome.com/releases/v5.0.13/css/all.css" integrity="sha384-DNOHZ68U8hZfKXOrtjWvjxusGo9WQnrNx2sqG0tfsghAvtVlRW3tvkXWZh58N9jp" crossorigin="anonymous">
  <title>DevCamp React Starter</title>
</head>

<body>
  <div class="app-wrapper"></div>
</body>

</html>
and lets change that to Birthday Countdown
index.html
<title>Birthday Countdown</title>
and let's head over to our application in the browser and you'll see that it now say Birthday Countdown in both places.

Now, what I want you to do is inspect it and lets look at the HTML here, or the elements. I'm going to open up body and you'll see that we have our app wrapper.

Now, you'll see back in our index.html that we have this app wrapper. Now if you remember I said that we are basically putting app into app-wrapper from components/app which contains our h1
So head over to our application and open up app-wrapper and you'll see that we have a div and that div has our Birthday Countdown.

Which is exactly what we have in our app.js. So that's basically how the setup works, that's how we get started and that's how we are basically injecting our components into our HTML. So let's go ahead and go back to our terminal I'm going to open up a new terminal here in VS code, if you're using the regular terminal just make sure that you are in your birthday directory.
And I'm going to type git status, git add ., and then let's type git status again and you will see that all of our files have turned green and that is because we have just added those to version control.
So now what we need to do is say git commit -m "app setup" so this was our initial commit we got our application setup and we talked about a few things. So basically in this commit message when ever you commit you just want to explain what you did with these files.
So that puts it in git and now all we have to do is push it up to version control so we can have it on github. So let's go back to Chrome and lets open up a new tab and go to Github.
So what we want to do here is just start a project and you just need to click the start a project button and then you can name this what ever you would like. I'm going to name this BirthdayCountdown and you don't have to switch the owner, most likely you won't even be able to, unless you are part of a few other organizations.
Now, I'm just going to select bottega-code-school as the owner to make sure that it is part of bottega-code-school. Now I already created a project called BirthdayCountdown a while back on this account, I'm actually rerecording this course to make sure that its quality material and to increase the font size so that you can actually see it.
So I'm going to name it BirthdayCountdownApp, and for the description what I want to do is say "A birthday countdown application showing students how to build react components and use CSS Grid with ClipPaths." Now, you can put what ever you want here in the description. I'm also going to make this repository public and then I'm going to hit Create Repository.

Now, what I'm going to do is basically link each commit to my repository in guide note in each video, that way you can reference these and see what your code looks like compared to mine in each video. You can also go into these code files and copy my code if you didn't type it our or yours is not working.
I absolutely recommend writing out the code and not just copying it or you won't really learn anything.
Now, basically you are going to see this screen

and what we want to do is basically follow this last set of instructions about pushing an existing repository from the command line because we have already typed in git init and all of that. So what we need to do is add the origin so we want to copy this first line of code, and then lets paste it into our terminal and then hit return and that will give us our origin.
Now, if we type in git remote you'll see that it says origin. Now when we use Heroku to push this up in the next video will have two of these so let's say git remote get-url origin. Now that will show us the origin and basically this is where we are pushing up our code, which is obviously our repo here on GitHub.
So now all we need to do is just push. So go ahead and copy this last line of code on here and lets go back to our terminal and paste it in and hit return. That will put our application on github and that will set us up.
So this video has gone on really long and you probably need a break so what I want to do is basically end the video here and then go on in the next video and show you how we can push our project on to heroku, so we can host our application live on the internet.
So what I'm going to do here is basically just explain this real quick and if you reload the page you'll see that we now have our code up here and that's basically all there is to it.

Now it says there's a potential security vulnerability, I don't think we need to worry about this. I'm not worried about anyone getting into our application we are not going to have any sensitive information on this, so we should be fine.
But it looks like it's just part of the one of our node modules so some library that were using in this application has a potential security vulnerability so don't worry about that, by the time you are doing this it could be gone it could be updated anyways I'm just going to hit dismiss and I'm going to put Risk is tolerable to this project.

Now that is a perfect one for this because we're really not worried about any Security in this application. We're just learning basics of react and there is no sensitive information at all we're not putting in credit card information or any of that.
So go ahead and hit dismiss there and you will see that our code is here. Now this is a repository and again I'm going to be linking commits if you click on commits and you click on our initial commit here(app setup) you'll see that it includes the code that we changed.
Now there is a whole bunch of code and that's just because we didn't really write a whole lot we just generated it. Now after we do another commit or after we push to heroku I'll show you basically how this works.
Because this is a really confusing example because we clearly didn't write any of this code, a lot of this was just generated by the js generate react devcamp builder or what ever its called. Okay lets go back to the homepage for this app on GitHub and lets end this guide here and move on to pushing to heroku before we get started with all of our code.
I'll see you in the next video.
Terminal
git status
git add .
git commit -m "app setup"