- Read Tutorial
- Watch Guide Video
I have the github profile for them right now.

This has a number of instructions and some of them are very helpful such as being able to see some of the common commands but then some of them are not so helpful. They have a few steps that are missing, so I want to make sure that you get all the information you need in order to install this properly.
Now if you're on a Mac, this is a much easier process. You could simply install using homebrew, that's what I have on my personal Mac and it works perfectly. But if you're using a tool like Linux and this is very good practice because say that you are building out some kind of deployment environment such as a server then you're going to have to follow steps like this so right here.

It gives you the basic get checkout setup and so what I can do is copy this and I'm going to paste this in. And so what this is going to do is it's going to come to this exact repo. You may notice that this url is exactly where we were right here and it's going to grab this code and it's going to paste it into our local machine. We can test this out if you want to say ls ~/.pyenv and this is going to show you all of the files that it just installed.

So let's keep on going down the line. It gives you a few more commands to run and a number of these could be grouped. They simply are giving you some other examples and exceptions if you are interested. Such as if you're using the zsh shell instead of the bash shell but we're using bash though. So just follow these commands right here pretty much verbatim. So we're installing the pyenv root global variable then we're going to add this to the path and then moving down here to step 3. We are going to take all of this and paste it into the profile.
I'm going to walk through and exactly what's happening right now. I want to show you that after I've installed all three of these things so what these commands are doing. Any time you're in Linux and you see this echo command, this means that it's going to take the very next argument which is typically some kind of string and then it's going to echo it's going to repeat it out. Now if you say echo some kind of string and then you pass in on these to greater than symbols. Followed by a file like we did right here then it's going to take that string and it's going to put it in whatever file we passed to it.
Now if we don't then you can just print something out so I could do something like this and say echo. Hi there. And you can see that it repeats. Hi there.

Because we're echoing that out, but if you say echo a string followed by this kind of process where of these greater than symbols and then the path to a file you'll place those items in a file and before you go into seeing how that works. Because I want these guides to not just be about how to work with python in an environment but also how to learn Linux.
So right now you can see all these files. If I create a new one so I'm going to say some kind of testfile.txt. And now you can see that we have this test file right here.

If I want to paste something inside so we can make sure that it's blank just by saying vim testfile.txt, you can see that this file is blank. You can type the command :x to get out. And now if I say echo and then wrap a string with these quotation marks and say Hi there and follow that with two greater than symbols followed by the path to the file which is testfile. And then if I run that and now take a look at this. You can see we actually have the text right there.

So that's what we're doing, there is nothing magical and you can type :q or :qa to get out and that's the vim text editor and I have an entire course on vim if you're interested in those common commands. It's a text editor that I use on a daily basis. You may use sublime text. So what we just did right there any time you want to open up a file you can use sublime text for any kind text editor to open them up. I like to use vim because as an instructor I like to show you things and not switch between different applications as much as possible, right there I'm just showing you what's inside of it.
Now, what we're doing here is you may notice the exact same pattern. So all I'm doing is I'm saying echo this command so this entire string into the bash profile, that's all we're doing. So it's exactly like what we did there we're just adding some content to a file. It's kind of a fancier way of doing it, technically I could have just opened up the bash profile and then added these three lines of code.
The main reason why I didn't do that was not so that I could try to impress you or anything like that, it's really not that impressive. Like I just showed you just adding 3 lines of text to a file it's pretty basic. The main reason I showed you this is because you're going to come across this kind of path and this kind of command in documentation quite a bit. So you're going to run into all kinds of programs that tell you to do something like this and so I want you to understand what's going on. There's nothing magic about it's just being able to add some code to a file. And so if you open this up and you can open this up in a text editor I'm going open it up in vim.
And so if you open this up and I say bash profile you can see each one of those elements that we pasted in.
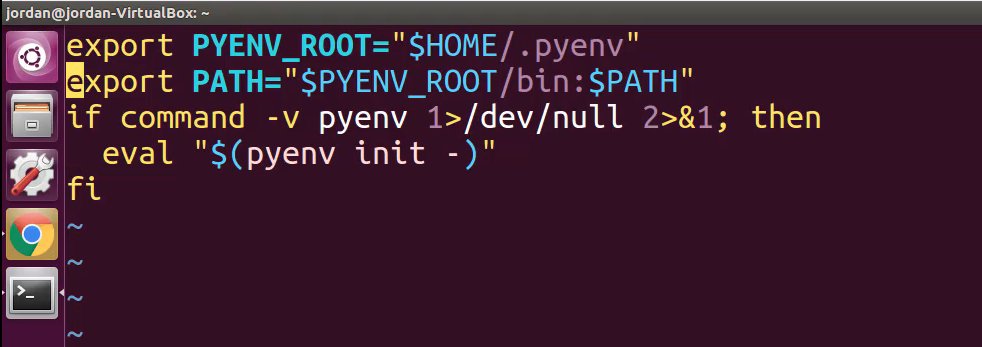
You may notice that that's all we did, we just pasted some code into a file. Now let's walk through what these are doing, we are exporting a variable here so this is a system configuration variable. Anytime you export something in a profile like we're doing right here then this is going to be available to the system. So in this case what we're doing is we're saying I want to take a variable called pyenv route. And I want to set it equal to this value of $HOME/.pyenv.
And so what this is going to do is it's going to set this entire path here everything in the string it's going to set it and store it in this variable and then from there it's going to go down to the next line. And notice how we have this $PYENV_ROOT this is the same thing that we just set up in line 1, that's all it is. And so we're going to say I want you to take pyenvroot and then I want you to add this to the bin path. So we're just saying I want you to add this to the system path and I want you to export that. Then check down here if the command dash v with pyenv 1 is null which just means in other words if this doesn't work then I want you to automatically run this command of pyenv init which allows us to start up the entire process.
So let's go back and see what other instructions there are. So it says here to restart the shell for the changes to take effect and then run this command. Oh yeah, I'm going to give you a little bit of a spoiler alert, this technically is not going to work. You still have to follow that process but they left out a very important step. So I'm going to restart the shell come back here and I'm not even going to zoom it up just because what I'm going to show you is not going to work.
If I say pyenv right here you can see it says no command found. And did you mean these other libraries?

And this is not what we meant. The problem here is that in certain systems the default shell. So our terminal is set up as what is called the log in Shell. But in Ubuntu when with this installation that is not the case by default. You have to change the setting and it'd be really nice if documentation would explain that because I've run into this issue many times and so you need to make sure that you change that. And the way you can is by just coming up here to the menubar click on edit go to and profile preferences

go to command and then change it to say run command as login shell then hit close.

And now let's restart it and now we actually can zoom in because this is going to work assuming that this works the same way that it used to the last time I installed something like this. So let's run this command here of exec "$SHELL"if I paste this in then that looks like it worked. Now let's try it I'm going to say pyenv. Now it doesn't give me the error and say it can't be found. Now it actually says we can do everything that we want. So this is working really nicely.
Now, everything's installed and everything's working properly. Now we can actually run the commands we saw here at the very top. So if you scroll up you can see we can do things like pyenv versions. This will show you all of the different versions that you have installed, I can say pyenv versions and you can see that right now we only are getting the system one, and that's perfectly fine, that's that's what is available pyenv by itself doesn't come with any different versions of Python installed.

So let's come down and see exactly how we can change this how we can install them and the guidance for that is right down here. So in Step 5, this is a way you can install your versions of Python now. Now I don't care about version 2.78 Let's come here and paste in and let's say 3.6 and OK it says not found and that's fine because I didn't remember the exact version that we wanted. So you can come here and pick out from any of the versions of 3.0 6 and then run that.

So I can say pyenv install 3.6 and let's just say 3 it really doesn't matter. All that matters is that it's 3.6 it could be any of those just don't pick that dev one because what that means is that's going to give you the very latest version which might have some bugs in it, so you can pick from any of the other ones. And this is going to work and it's going to give you the version of python that is one of the latest.
Now if you are watching this video and maybe it's a year or a couple of years from the time it was filmed then you might be working on Python 3.7, 3.8, 3.9, or even 4. And then, in that case, install those versions the same commands and those things those should all apply. So right now the pyenv system is going out it's finding the latest version specifically 3.6.3 and it is now installing this directly on our system. And now because of that what that means is we're going to be able to use that and we're going to be able to build our programs with it and then if we want to switch to something else.
So if we want to switch to Python 2.7 or 3.5 or anything like that then we can simply install those on our local machine here and then we can switch between them whenever we need to.
Okay, it looks like that worked.

Let's see then we got warnings some warnings, don't worry about that. Only if you get some errors does that mean that it's a problem it says that it installed this and it even gives the path. And this is a very helpful because you may need to directly access this at some point. Now in order to make this the default version on our system then we still have a few more commands to run. So let's see in here where what we need to do. We don't care about uninstalling. You're going to look for a command called global I'm pretty sure it's just going to be running pyenv global. And yes so right here this is what we're looking to do.

So I'm going to say pyenv global 3.6.3 and that's it. So now let's type python and now you can see that we have Python 3.6.3 Installed.

Now if you've been following along especially in the last video then you may have remembered that when I typed python in before the default value that we got or the REPL that opened up was 2.7. So now that we're using pyenv we can switch and we can install any version of Python we want and then using commands like this, we can set the global versions on our system. This is a great way to be able to dynamically install and then switch between any version of python that you need for your program. So great job if you went through that you now have the ability to work with any version of Python on your own Linux system.