- Read Tutorial
- Watch Guide Video
In this video, we're going to continue working with image tags.
In the last video, we saw how to use a URL as the image source, but now we will address if and when you may need to use an image from your local computer or server instead.
To do so, create a <div> and an image tag. Here, we'll use a relative path, as opposed to the absolute path that we have used earlier. An absolute path is typically a website that you hard code while a relative path depends on the location of the HTML file and the image. For example, if you have both the image and HTML file on your desktop, you can simply have the name of the image file as the source.
<div>
  <img src="duck.jpg">
</div>
However, if you have all your image files inside a subfolder on your desktop. To access these images, you'll have to change the path to include the subfolder. Also, you still have the ability to add width, height, and alt options, similar to the URL.
<div>
  <img src="duck/duck.jpg" width="145" height="125" alt="Cool Duck">
</div>
Next, we'll make images "clickable". One way is to wrap it inside a <a href> tag, such as below:
<div>
  <a href="http://devcamp.com">
  <img src="duck/duck.jpg" width="145" height="125" alt="Cool Duck">
</div>
There is another way to achieve this with an option called usemap. To use this, we will create an ID called "ducklinks" or anything else you desire. We are going to go in depth about IDs in a later section, but for now, just remember that IDs start with a "#" sign.
<div>
  <a href="http://devcamp.com">
  <img src="duck/duck.jpg" width="145" height="125" alt='Cool Duck' usemap="#ducklinks">
</div>
Now, we must give a value for "#ducklinks", and for that, we implement a <map> tag. A useful aspect of this tag is that it allows us to segment the image into different parts, where each part can take the user to a different link. For example, we can make the right side of the image go to one link and the left side to another.
In the <map> tag, the first thing we'll do is give a name matching the value in the usemap option (without the "#" sign). This name is what connects the usemap with the <map> tag.
Next, the <area> tag inside the <map> tag allows us to decide on the area that needs to be clickable. Here, <area> takes two options-- shape and coords. You can choose from rect or circle for shape, and for the coords, you'll have to mention the values. You can also have an alt option if you like. Lastly, put a <a href> tag, where you'll mention the URL that'll be opened when a user clicks the corresponding part of the image.
<map name="ducklinks">
  <area shape="rect" coords="0,0,25,25" alt="goes to google" href="http://google.com"></area>
</map>
If you refresh the browser, the image is clickable only in the area that falls within the mentioned coordinates.

Now, change the coordinates a little bit, to explore how another part of the image goes to a different site. Then, let's change the shape to circle. For the rectangle, you gave four coordinates, but for circle, you need to give only three.
<map name="ducklinks">
  <area shape="rect" coords="0,0,25,25" alt="goes to google" href="http://google.com"></area>
  <area shape="rect" coords="40,40,25,10" alt="goes to yahoo" href="http://yahoo.com"></area>
  <area shape="circle" coords="125,75,50" alt="goes to devCamp" href="http://devcamp.com"></area>
</map>
And this is the clickable part of the image.
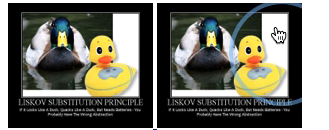
You can see the circular area it covers.
Going to three different sites, simply by clicking on three different areas within an image is impressively handy. This can be particularly useful when you can't use JavaScript for a website, and yet you want users to click on images. For example, I had to work on a similar project in the past, where the client's platform would not allow me to use JavaScript. Still, I had to make every item from a product catalog image go to that particular product's URL page. I did this using the <map> tag. It may become vital to you in future projects as well.