- Read Tutorial
- Watch Guide Video
The way we're going to install Python version 3 is by using a website called brew.sh which will take us to the Homebrew website. Homebrew is a package manager for your system that will grant the ability to download Internet software packages by performing all the various steps for you.
In this example, we have Python working on your system, but Homebrew can be used to install all kinds of packages. Personally, I have about 100 packages or so on my local machine stored under Homebrew. To install it, go to the website brew.sh and copy the line of code below and paste it inside the terminal.

If you've never seen the terminal, there are a few ways of getting there; my favorite way on a Mac is to use the spotlight search (command and spacebar).

From here, type in terminal, hit return to bring up a new terminal, and you should see the command prompt.

Now, if you don’t have that or it doesn’t appear in the search results, we will walk through another way of getting to it. First, open a new binder window.

Here, is the Finder window, where I can come and click on applications at the very bottom, then select utilities.

At the end of the list will be the terminal.

If I double click this, the system will open up.
To clear your screen from clutter, hit control L. Although this is not needed, it is a convenient tip. After this, come back to Homebrew to make sure it is still copied in your clipboard, paste it, then run it.
Now, I already have Homebrew installed on my system, so I do not need to follow these steps. However, this will be the command for you to run it.
/usr/bin/ruby -e "$(curl -fsSL https://raw.githubusercontent.com/Homebrew/install/master/install)"
Clearing this will take a few seconds, or a few hours, depending on your internet connection. Once it is installed and ready, you just have to type it or possibly restart your terminal then type in:
brew install python3
Hit return.
I do not need another version, but it will find the Python 3 library, install all the dependencies, and allow you to run Python 3 code on your system.
As you can see, it gave me an error since Python 3 is already installed. Here, you are able to see all the Homebrew libraries on my current system, which will begin to populate as you begin to have more libraries available as well.
The way that you can test this is by typing in as below:
python3
If everything worked in the installation properly, then below is the output that you should see:
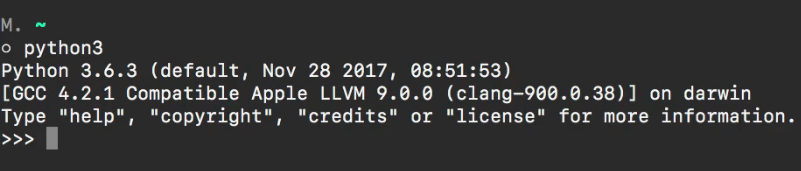
You might have a slightly different version of Python such as 3.6.5, but as long as it begins with 3, then it will work for this course.
The way that you can tell that this works, is if you can execute Python code. Insert our example from before.
print('Hi there')
If I hit return, you can see that “Hi there” gets printed out to the screen.

This means everything is working properly.
The same command clutter-clearing command, control L, applies here. However, the route to exiting out of this is called the Python Repl. Upon pressing control D, it will show three small angle brackets inside of the Python Repl.

If not, you will have a normal terminal print out spot. With all of that in place, you are ready to start running Python code on your Mac.