- Read Tutorial
- Watch Guide Video
In this guide we're going to fill out the rest of our form here. We're going to also populate the entire proposal in real time.
I'm going to pull in a proposal.

This is a full proposal that the freelancers can send to their customers and it has all of the items inside of here. We're going to remove some of the text and it's going to be replaced dynamically as the freelancers are entering their form into the information. I'm going to copy this and I'm going to come down into our proposal new component and inside of this div

I'm going to put all of this code. Let's format it really quick. And I'm also going to slide this down(he closed the browser console) so that we can see this all on the page. This is going to be all nested in the same div but we're going to create paragraph tags just so it kind of looks better. So at the end of each one of these paragraphs put a paragraph tag. And then we'll put one at the beginning. And I'm also going to give us some more room here. So the way you can do that is inside of Sublime Text go to view and in layouts you can go single, which is what it's at right now, or you could go down to rows two, which is where we were before and you have a number of other ones. And if you memorize the keyboard shortcuts that can make a lot easier to work with your system.
Now that we have that let's come down and we're going to copy these paragraph tags as well. I'm going to add these to the front of each one of these items. And now let's indent it for good measure. So if I hit save you can see that we have these items here.

And what I want is I want to get rid of the hard coded values and I want to instead use the ones that are going to be coming in from the form. So the very first spot we could do that is here in customer name. We can give our double curly brackets and inside of this we can just bring in our ngModel. So in this case it's proposal.customer.
<p>Hi {{ proposal.customer }},</p>
As you can see this is gone now. But as the freelancer is going to be typing this in it's automatically going to start filling out his entire proposal which will be really cool.

So let's see where else this needs to work. We have the customer name and there's nothing else inside the first paragraph that needs to be touched. In the second one, you see where it says "I will be utilizing Ruby on Rails, Angular, and PostgresSQL, and a number of other tools?" Right here I'm gonna get rid of that text. And this is going to be our tool section. So right here. We're going to replace all of this with Proposal tools.

And if I hit save, all it's going to do is get rid of the list of tools, that's just going to be empty space but then when you start typing this into the form it's going to auto fill it. Next one we're going to look at is these other ones. "Ensuring they are fully informed." That one's not going to change. "To accomplish the project and meet the requirements we discussed, I'm estimating that will take 80 hours..." This 80 hours, this is going to be replaced by our hours. Let's take a look at our proposal. We have estimated hours right here. So this is going to be estimated hours "in development time to complete. The project should take around nine weeks." So right here these are our estimated weeks I believe our item is weeks to complete. "To complete and with my hourly rate of $120..." so this 120 is going to be that hourly rate value, which is just hourly_rate. "The estimated total will be $9000". So this one is a cool one because this one we're actually going to process some math to make this possible. The way that we're going to do this is, I'm going to copy all of this, and we're going to be able to generate the total by multiplying the hourly rate by the estimated hours. So that's going to be a proposal dot hourly rate times, which uses asterisks, proposal dot estimated hours.
{{ proposal.hourly_rate * proposal.estimated_hours }}
This is going to generate that. If you hit save everything is here.

It does give us a little not a number but that's going to be fixed as soon as we start entering text in and start entering those items in. Now that we have that all in place let's start filling out our form values. So this is a form group. So we're going to create another form group here.

And one thing that I always find helpful when I'm doing this kind development is either having copying and pasting something like this over or you can also just come here and bring the values here.

So this way we can see all of this on one screen which makes it a little bit easier.
Let's fill in the ID right now but eventually this is going to come in from the API and we're not going to worry about this at all. But for right now we can decide on that later. But that's one of the nice things about being optional we don't have to worry about it.
So we have customer name, next one's going to be portfolio URL. So this one is going to be, let's change the label to portfolio URL. And then we have to change each spot where it says customer we need to change that to portfolio URL.
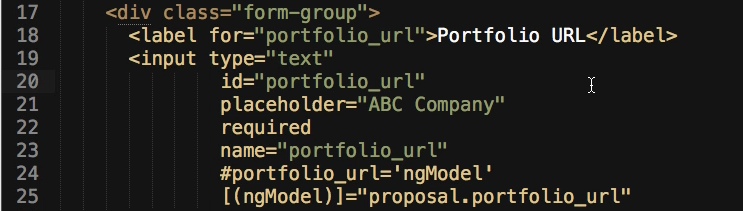
This is pretty neat because look what we can do on this one. We can say whatever's typed in here and then we can type in the name, so we can say like devcamp.com.

As you can tell nothing's getting populated here, and that's because what we actually want on this is to have on this first paragraph. You see where it says "check out some of my past projects here." We want "here" to be a link that has the portfolio URL inside of it which I think is kind of a neat way of doing it. So the way that we can accomplish this is by coming down here and we're going to create an "a tag" and in the "a tag" we're going to pass in an "href" and inside of this "href" we can use the same double curly brackets and we'll put the portfolio URL.

Just make sure you also do proposal. or else that's not going to work. And then inside of here we're going to have the text and then we'll close off the "a tag." If I hit save now you can see that this is a full link. Now if I click this then you can see here that it didn't work. So what exactly is the problem? Let's come back.
I'm going to right click on here and inspect and we'll see what is going on with it. As you can see we're not getting our value overridden. All it's doing is setting this value, it would probably help to actually type something in. So here we can say devcamp.com. And now if I click on it it works so it just needed to be refreshed for some reason. That's all working now.
Just to review, all we did is we created an "a tag" that has a "href" inside of it and then we are sliding in this URL as the href. So this is just going to slide it in, the text won't change but the values inside of it. And if you noticed when I clicked inspect, notice how this happens in real time. So pay attention to this line in the inspector as I start typing this in. So as I start saying devcamp.com notice how that's actually updating all in realtime

We're setting this attribute here, even though it wasn't set when the page originally loaded. You can also see some other things that are here that we don't actually have in our code. You have this ng-reflect-href and that is something that's provided by Angular. It's an attribute in angular that's being slid in that we don't have to do anything with but it's using it so that we can get this kind of live behavior. So that is our portfolio URL.
Looking down, the next one is our tools so let's create another form group. This one is going to be tools. We'll say "Tools that you will use on the project." And then inside of this, instead of portfolio URL we'll call them tools. Oh and one thing that we did have that was kind of messy just bad practice here. We need to get rid of our placeholder for the portfolio URL and our placeholder here we can say something like, "Ruby on Rails, Angular, etc." Just so the developer, the freelancer has a good idea on what's going to be used here. Now if I hit save this is going to be updated.

and pay attention to some of the things that are happening. So right here in this second paragraph we have "To successfully build out the application I'll be utilizing" this is where this text is going to go. So here if I say that I'm going to be using .NET for some reason I'll say, .NET, ASP, C#, things like that. See how it's all updating right here.

I like this because this is pretty cool. This means that any kind of freelancer or developer can use this and they can simply enter in a few items and a full proposal is generated for them.
That's done, let's keep on moving down the line. Next one is going to be estimated hours. Estimated hours we don't want a placeholder. And this one is going to be here. We'll just put estimated hours. Once we start styling the form we will probably update these labels to be a little bit more descriptive. This is going to be of type number. And then in here we're going to change this to be estimated hours. One thing I want to point out here, I just read yesterday a great blog post from thoughtbot and they were talking about some very important things that developers sometimes skip over when it comes to building forms. And one of them is neglecting to update this type. So when you have an HTML5 form then each one of your inputs has a type and if you're lazy then you may just keep that type at text but what that does,

if I hit save here, is you can't really tell. Usually with a normal form with estimated hours is. However, when it comes to using this on tablets or smartphones then having a type number actually comes in pretty handy because now look at this.

Here you see how we can actually use these little number pickers and watch what's happening down here. It says I'm estimating that it will take. And then we have this blank spot here.(the numbers are changing in real time as Jordan scrolls through the numbers.) If I come and start typing, look at that. We're able to increment the value of the estimated hours just by clicking right here and this may or may not be something that you would use in a browser, however, on smartphones and tablets this can be very handy. So make sure you're always updating your type.
Moving down the line. Now that we have our form group for estimated hours the next one's going to be hourly rate. And this one is also of type number. So that's all we should have to do on there. And just for the sake of time we'll keep on moving down the line we'll test them out when they're done. We're just about done with it.
Weeks to complete is the next one. This will be of type number as well. And then the last one is going to be client email. What I'm envisioning for this is, I want to have our API. So when we create our Rail's micro service I want the proposal micro service on the rail side to not only store a record of all the proposals but I also want them to, the rail side, to email a link to the client. This is where we can have a client email so that this will be sent along with whenever we go and create a proposal. This will send it up to the rails server and then the client can be emailed from there. We'll put client email and we can even put in here something, we can put it like the emphasis tag that says optional.

Because it's optional I'm going to get rid of this required statement here. And this is going to be of, not type text, but of type email which is also very important because we get some built in validators because of this. And I have weeks to complete. It's going to be switched up and we're going to say client email. If I hit save of all of this is working.
Let's actually see if our whole system is working so let's create a full customer. Let's put customer name is Google. Here we'll say devcamp.com. Tools that we're going to use, we'll say Rails, Postgres, and that looks good. Estimated hours, on this one let's say the estimated hours are going to be 80. So we have 80 hours. Then we have an hourly rate, let's say of 120 hours. Weeks to complete we can put 12. Client e-mail, this isn't going to update anything on the page. We'll still put something on there.

All of this is done now. As you can see we now have a fully filled out proposal and it all happened in real time. We didn't even have to you know press submit or anything like that, which I think is a really neat way of doing this. And additionally look at our generator here. Not only is this generating the proposal and filling in the information but our calculation here, if you notice we never created a total but because of what we did here when we said hourly rate times estimated hours, what Angular did is it combined both of those, multiplied them and now we have 9600. 9600 is our hours times our hourly rate. So we're able to generate the full proposal just like that which I think is pretty amazing. And this is something that you'll see in a lot of new modern development in modern applications is the ability to update different elements on the page all in real time without even having to communicate with the server.
That was a little bit longer of a guide but I think it's really important to finish out this entire system here. And in the next few guides we're going to start building out some of the other components that you need in order to have a fully functional component.